Pages
A page in Shopify, such as About, Contact or Shipping, has two halves. You write its title and text in Shopify admin. The template you assign decides which sections show around that text.
The page templates Pawsome ships
Section titled “The page templates Pawsome ships”| Template | Sections | Use it for |
|---|---|---|
| Default page | Page | Text pages such as shipping or terms |
about |
Page, with sections such as Image with text overlay and Media with text around it | Your About page |
contact |
Page, then Contact form | Your contact page |
faq |
Page, then FAQ | A help center |
The Page section shows the page title and the text you wrote in Shopify admin. Besides the color and spacing settings every section has, it offers:
- Content width: Narrow, Medium, Wide or Page width. Narrow is the default and reads best for long text.
- Show page title: the title is the page’s main heading, so leave it on unless a section above it supplies that heading, as in the
abouttemplate. - Title alignment: Left or Center.
Create a page and assign a template
Section titled “Create a page and assign a template”- In Shopify admin, go to Online Store > Pages.
- Click Add page.
- Enter a title and, if you want, some text.
- In the Online store area, pick a template from the Theme template menu, such as
contact. - Click Save.
Then add the page to a menu under Content > Menus so shoppers can find it.
To edit the template’s sections, go to Online Store > Themes > Customize and open the template from the page selector at the top. A change to a template applies to every page that uses it.
The contact page
Section titled “The contact page”The contact template adds a Contact form section under the page text. Shopify emails each message to your store’s sender email address, which you set on the Notifications page of your Shopify admin settings. See Shopify’s guide to contact pages.
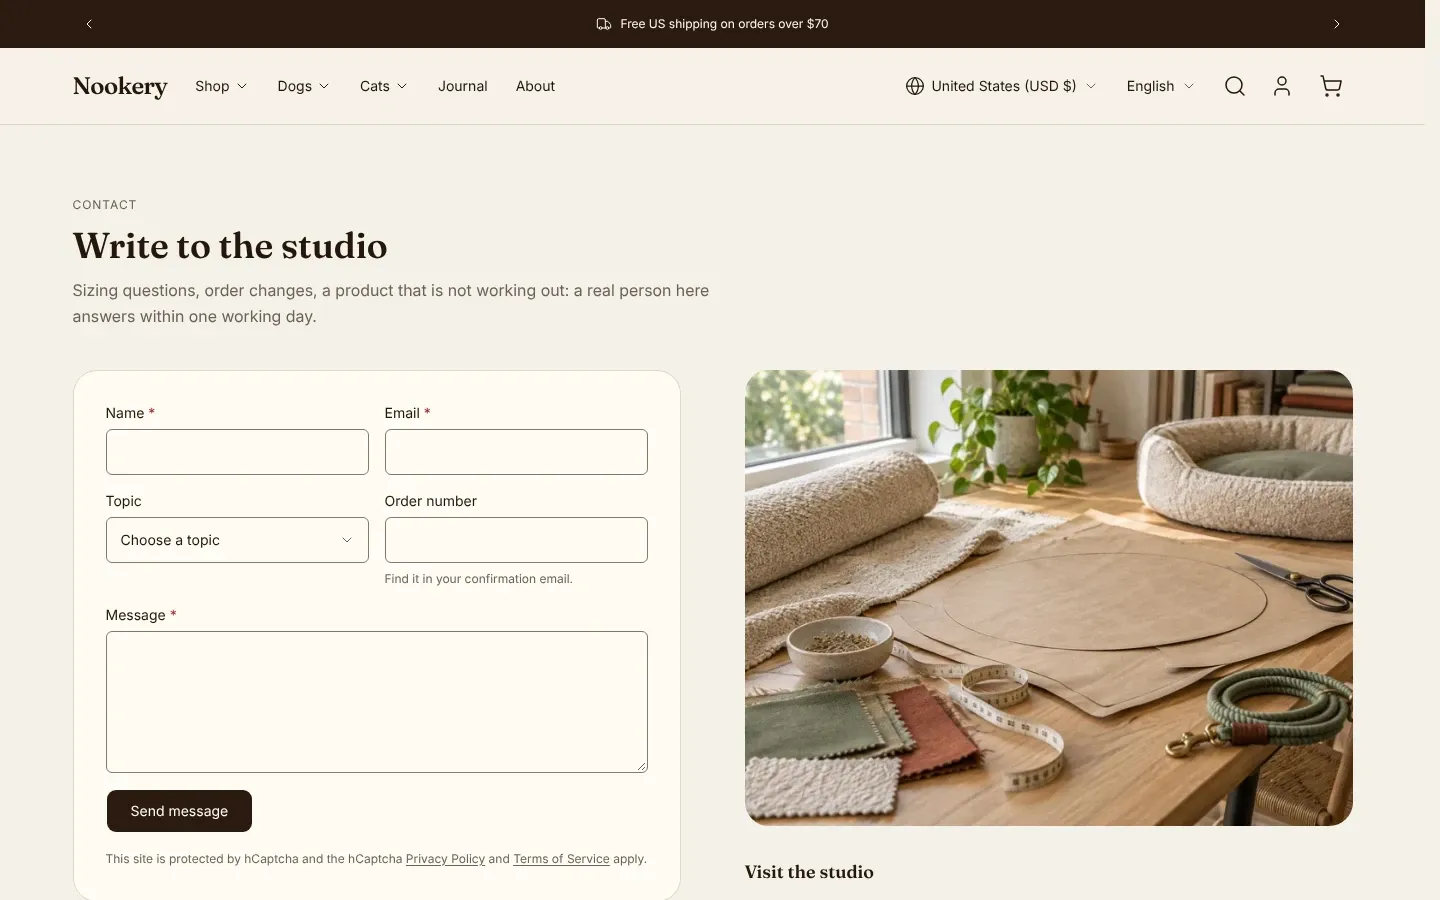
The form always asks for an email and a message. The settings control the rest:
- Require a name makes the name field required. It is on by default.
- Show a phone field adds a phone field. For signed-in customers it fills in from their account. Require a phone number makes it required.
- Show a consent checkbox adds a checkbox with your Consent text. Add a link to your privacy policy in that text. The answer appears in the email you receive.
- Field layout puts the name and email side by side with Two columns, or stacks every field with One column.
Add your own fields
Section titled “Add your own fields”Add Contact field blocks for anything else you need, such as an order number or a topic. Field type offers Text, Email, Phone, Web address, Paragraph and Dropdown. For a dropdown, list the choices in Dropdown options, separated by commas.
The Label of each block becomes the field name in the email you receive, so keep each label unique. Width set to Half only works with Field layout on Two columns. Field block position puts your fields before or after the message.
The contact template comes with two sample blocks, a topic dropdown and an Order number field. Edit or delete them.
Contact details
Section titled “Contact details”With Show contact details on, the section shows a panel with your address, a Directions link, email, phone, hours and an extra row for something like a chat link. Leave a field empty to hide its row. Layout sets where the panel sits: Form beside details, Details with the heading or Centered form.
After a shopper sends the form, the page shows “Thanks for contacting us. We’ll be in touch soon.” Shopify scans messages for spam and marks suspect ones with [SPAM] in the subject line, but still delivers them.
The FAQ page
Section titled “The FAQ page”The faq template adds an FAQ section under the page text, already filled with sample questions grouped under headings. Replace them with your own.
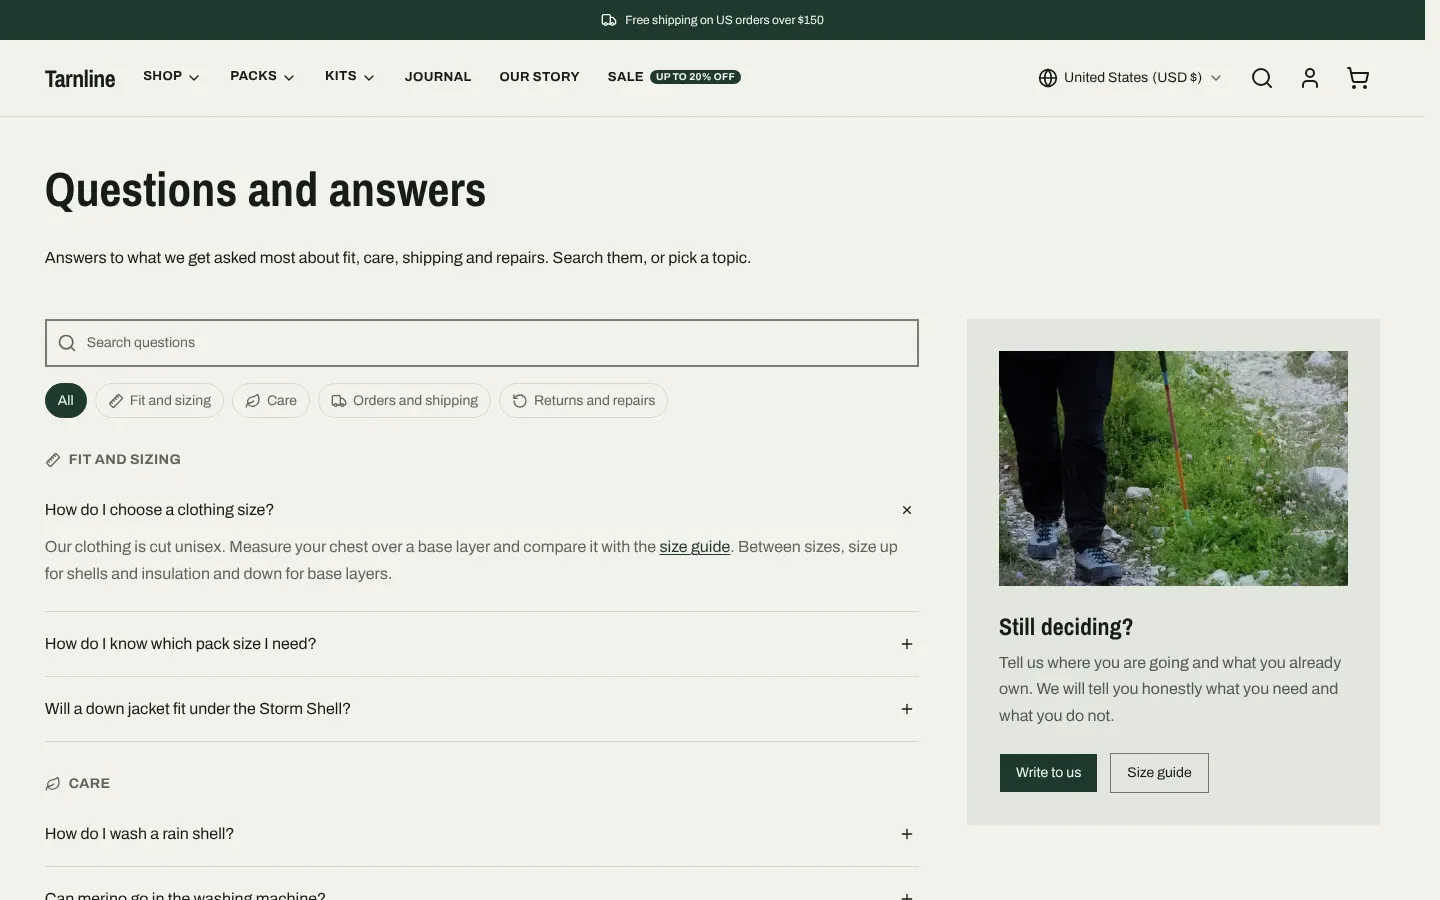
- Each Question block holds one question. Set Answer source to Text to type the answer, or to Page to show the text of one of your Shopify pages. The page option suits answers you keep in one place, such as your returns policy page.
- Heading divider blocks split the questions into groups. Each one covers the questions below it, up to the next divider.
- Show category filter turns the dividers into filter buttons above the questions.
- Show search adds a search field that narrows the questions as the shopper types.
- Link to each question opens the question named in the page address and updates the address as questions open. Copy that address to send a customer straight to one answer.
- Show support card adds a card with a heading, text and up to two buttons, below or beside the questions. Point it at your contact page.
Add FAQ structured data is on by default. It describes the questions and answers to search engines in a format they read. Keep it on in only one FAQ section per page.
You can add the FAQ section to other templates too, such as a product template for product questions.
Build an About page
Section titled “Build an About page”Every preset ships an about template for your About page. In the Pawsome, Cairn, Siesta and Tadpole presets it opens with an Image with text overlay section, then the Page section and sections such as Media with text. In Socket it starts with the Page section.
- In Shopify admin, go to Online Store > Pages and open your About page, or create one.
- Pick
aboutunder Theme template, then click Save. - In the theme editor, open the page selector at the top, choose Pages, then
about. - Replace the sample images and text with your own, and add or remove sections. These suit an About page:
- Media with text for a photo of you or your team next to a few paragraphs
- Timeline for how the store started and grew
- Multi-column or Text with icons for your values
- Testimonials for what customers say
- Scrolling image story for a longer story told in pictures
A change to the template shows on every page you assign it to.
The page needs one main heading for search engines and screen readers. When Image with text overlay is the first section, its heading is that main heading, so the Page section below it starts with Show page title off, which keeps the page to one main heading. If you remove that section or move it down, turn on Show page title in the Page section.
See Shopify’s guide to templates.
The password page
Section titled “The password page”While your store is locked, visitors see only the password page, with no header or footer. You lock and unlock the store in Shopify admin, in the store access settings under Online Store > Preferences. The same place holds the password and the Message to your visitors. See Shopify’s guide to the password page.
To design the page, open the theme editor and choose Password from the page selector. The Password page section shows:
- your logo from Theme settings > Brand, sized with Logo width
- a Heading, then your message to visitors from Shopify admin
- an optional countdown
- Show newsletter signup: an email form. Signups join your customer list as accepting marketing.
- Show social media icons: the links from Theme settings > Social media
Layout chooses Centered, Split or Full-width image. The last two take a Background image and an optional Background video. You can also add Text, Image and Custom Liquid blocks.
Visitors with the password use the Enter using password button, which opens the password form. After a wrong password, the form opens again on its own with an error. The bottom of the page has a login link for you as the store owner.
The launch countdown
Section titled “The launch countdown”Enter Launch date to show a countdown to your opening. Write it in your store’s time zone as YYYY-MM-DD HH:MM, for example 2026-11-01 09:00.
- The countdown shows days, hours and minutes. Turn on Show seconds to add seconds. Seconds stay hidden for shoppers who have reduced motion turned on, and when Animation style in Theme settings > Animations is None.
- It counts to that one date and stops. After it, the page shows your Text after launch, or “We’re open” if you leave that empty.
- It never restarts or loops. To count to a new date, change Launch date.
- If the theme cannot read the date, no countdown shows. Check the format if it does not appear.